 Door: Nijkerk Electronics
 Overview
Since the recent introduction of the SmartDisplay product, �Winstar�has focused more on the function and feature itself instead of how to control it on the HOST side with the customer�s final machine. This article takes a gauge as an example, describing how to transmit and update the physical switch and HOST(Arduino) data into the SmartDisplay module.
Description
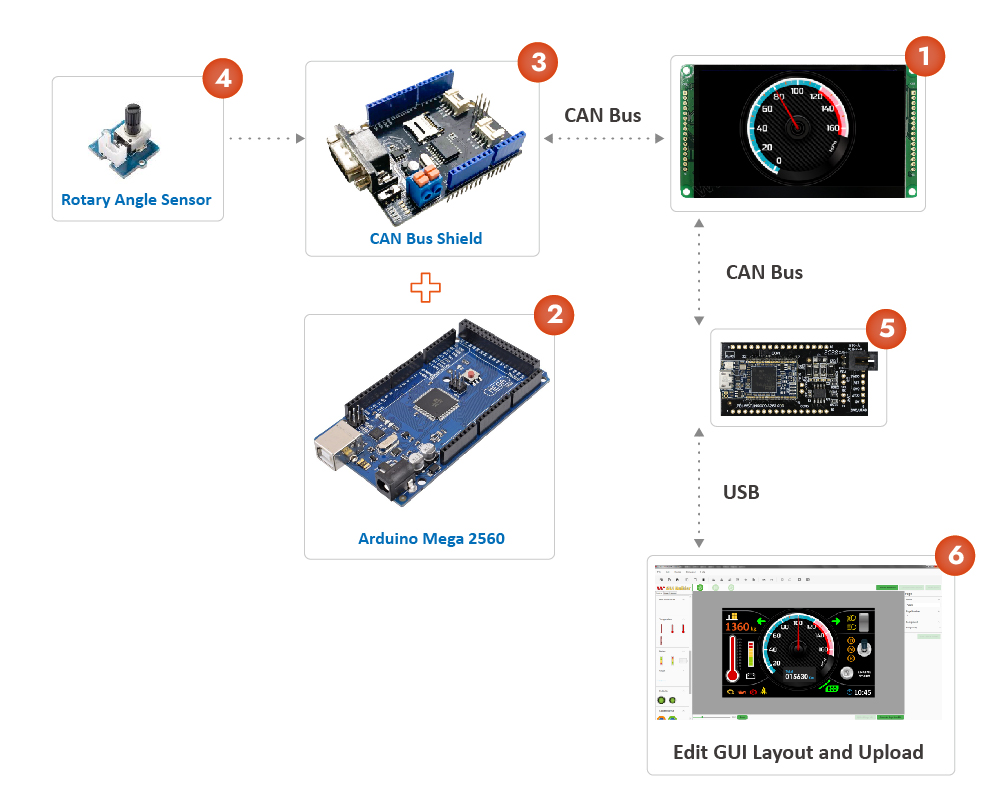
This article declares how to use a SmartDisplay CANBUS 4.3? module in displaying 240-degree Gauge received from a host controller. The host is Arduino mega 2560 board with CANBUS shield and Rotary Angle Sensor. Required components are shown below:
1.SmartDisplay CANBUS 4.3?
2.ARDUINO Mega 2560
3.CAN-Bus Shield
4.Rotary Angle Sensor
5.CANBus Dongle
6.Software GUI-Builder
System diagram
Step 1: Design the Project in GUI Builder
1.1 Create a new project and select 4.3? Display blank template in GUI Builder.

1.2 Change the background style 0 in the Resource panel; it selects the black screen image file.

1.3 Edit the rotation angle of the needle in the Gauge Edit window.
�
The first step is to click on Modify Button at the gauge style 6.

When selected, it will display a preview gauge in the gauge editor window, as shown below. Please follow the steps:

Check the box �Show Details� to show more information about the needle rotation.
Regarding the degree range of the needle, the minimum and maximum angle parameters can be changed by pressing the +/- buttons at the�Degree�area, as shown in the figure.

Value Range�is defined by two values. Value min and max are used to map the needle�s min/max rotation degree when receiving the value via CANbus.

When completing the Gauge design. You can check the result by dragging the Test Value track bar to the right, while the angle will increase until the max value/degree is reached.
Step 2: Build and Upload the Project
2.1 When the previous steps are completed. Switch to�the Page Info�sheet and drag the certain Gauge- style 6 to the center of the screen.
2.2 Connect the PC and SmartDisplay by USB2CAN, pressing the �Connect Device� and �Upload the project� icon. The resource and page settings will be updated to the SmartDisplay module via GUI Builder. Images refer to below:

2.3 The screen jumps from start screen to the operation screen, and the following screen appears on the SmartDisplay 4.3? CANbus, which means the upload process is successful.
Step3: Program the Arduino Host

3.1 Switching to the Page sheet of GUI Builder. The index of gauge style 6 corresponds to 0 ( 0x2000 ) defined in the CANopen structure. It is important to take note of an object�s index. An object�s status can be polled or changed while programming in the Arduino host if its index is known, showing as below sample code paragraph.
3.2 Use the Arduino host to set the type/ x/ y/ style/ configurations and background image of object 0 by � ConfigSmartDisplay� Function command in the program. Or the SmartDisplay will read the existing object data in the flash onboard (GUI Builder has uploaded the settings) and place the configured objects on the screen without programming by Arduino host.

3.3 When the Arduino host receives the value change from the physical Rotary Angle Sensor. It will send certain value to the SmartDisplay through the protocol of CANopen. Please refer to the following program for key points �command structure ids and sub-indexes�. The purpose of this program is to update the Gauge (object index 0) value according to the value changed from the physical Rotary Angle.

If you want more information or if you have any questions, please�contact Nijkerk Electronics!


